API Authentication
Generate an API token for your application
All API requests to Samsara must do the following in order for request to be successfully sent:
- use
https(nothttp). Read this for more onhttps- use TLS protocol version 1.2 or above
To make a call to the Samsara REST API, you need an API token. There are two types of API authentication mechanisms that will provision an API token for you:
- (1) API Tokens - for direct integrations
- (2) OAuth 2.0 - recommended for marketplace apps
NOTE: Your API tokens carry many privileges, so be sure to keep them secure. Do not share your secret API tokens in publicly accessible areas such as GitHub, client-side code, and so on.
NOTE: CORS (Cross Origin Resource Sharing) is not currently supported by Samsara. All REST API requests to Samsara must be made from a server-side application and cannot be made from front-end applications running in a browser.
Bearer authentication
Samsara authenticates API requests using Bearer authentication. You can use either API tokens generated in the dashboard or access tokens provided via OAuth. Pass the token in the Authorization header with the value of Bearer then a space then your token string.
curl 'https://api.samsara.com/fleet/vehicles' \
  --header 'Authorization: Bearer <<token>>'
requests.get(
'https://api.samsara.com/fleet/vehicles',
headers={
'Authorization': f'Bearer <<token>>'
}
)await fetch('https://api.samsara.com/fleet/vehicles', {
headers: {
Authorization: `Bearer <<token>>`,
},
});uri = URI('https://api.samsara.com/fleet/vehicles')
http = Net::HTTP.new(uri.host, uri.port)
http.use_ssl = true
request = Net::HTTP::Get.new(uri)
request['Authorization'] = "Bearer <<token>>"
response = http.request(request)using var client = new HttpClient();
client.DefaultRequestHeaders.Authorization = new System.Net.Http.Headers.AuthenticationHeaderValue("Bearer", "<<token>>");
var response = await client.GetAsync("https://api.samsara.com/fleet/vehicles");client := &http.Client{}
req, _ := http.NewRequest("GET", "https://api.samsara.com/fleet/vehicles", nil)
req.Header.Add("Authorization", "Bearer "+"<<token>>")
client.Do(req)HttpClient client = HttpClient.newHttpClient();
HttpRequest request =
HttpRequest.newBuilder()
.uri(URI.create("https://api.samsara.com/fleet/vehicles"))
.header("Authorization", "Bearer " + "<<token>>")
.GET()
.build();
client.send(request, HttpResponse.BodyHandlers.ofString());$ch = curl_init();
curl_setopt($ch, CURLOPT_URL, 'https://api.samsara.com/fleet/vehicles');
curl_setopt($ch, CURLOPT_RETURNTRANSFER, true);
curl_setopt($ch, CURLOPT_HTTPHEADER, [
'Authorization: Bearer ' . '<<token>>',
]);
$response = curl_exec($ch);Creating an API Token
As of April 11th, 2022, Samsara made a user experience change to how API tokens are created to add additional security, as shown in the video and detailed below.
Note: all tokens created prior to April 11th, 2022 will still be visible in plaintext and not blurred out. Samsara will soon announce a backfill where previous tokens will be blurred out as well
Go to the Settings page of the Samsara Dashboard by clicking the gear icon on the left-side nav bar. Then scroll down to "API Tokens". Click "Add an API Token" to create a new API token as shown below:
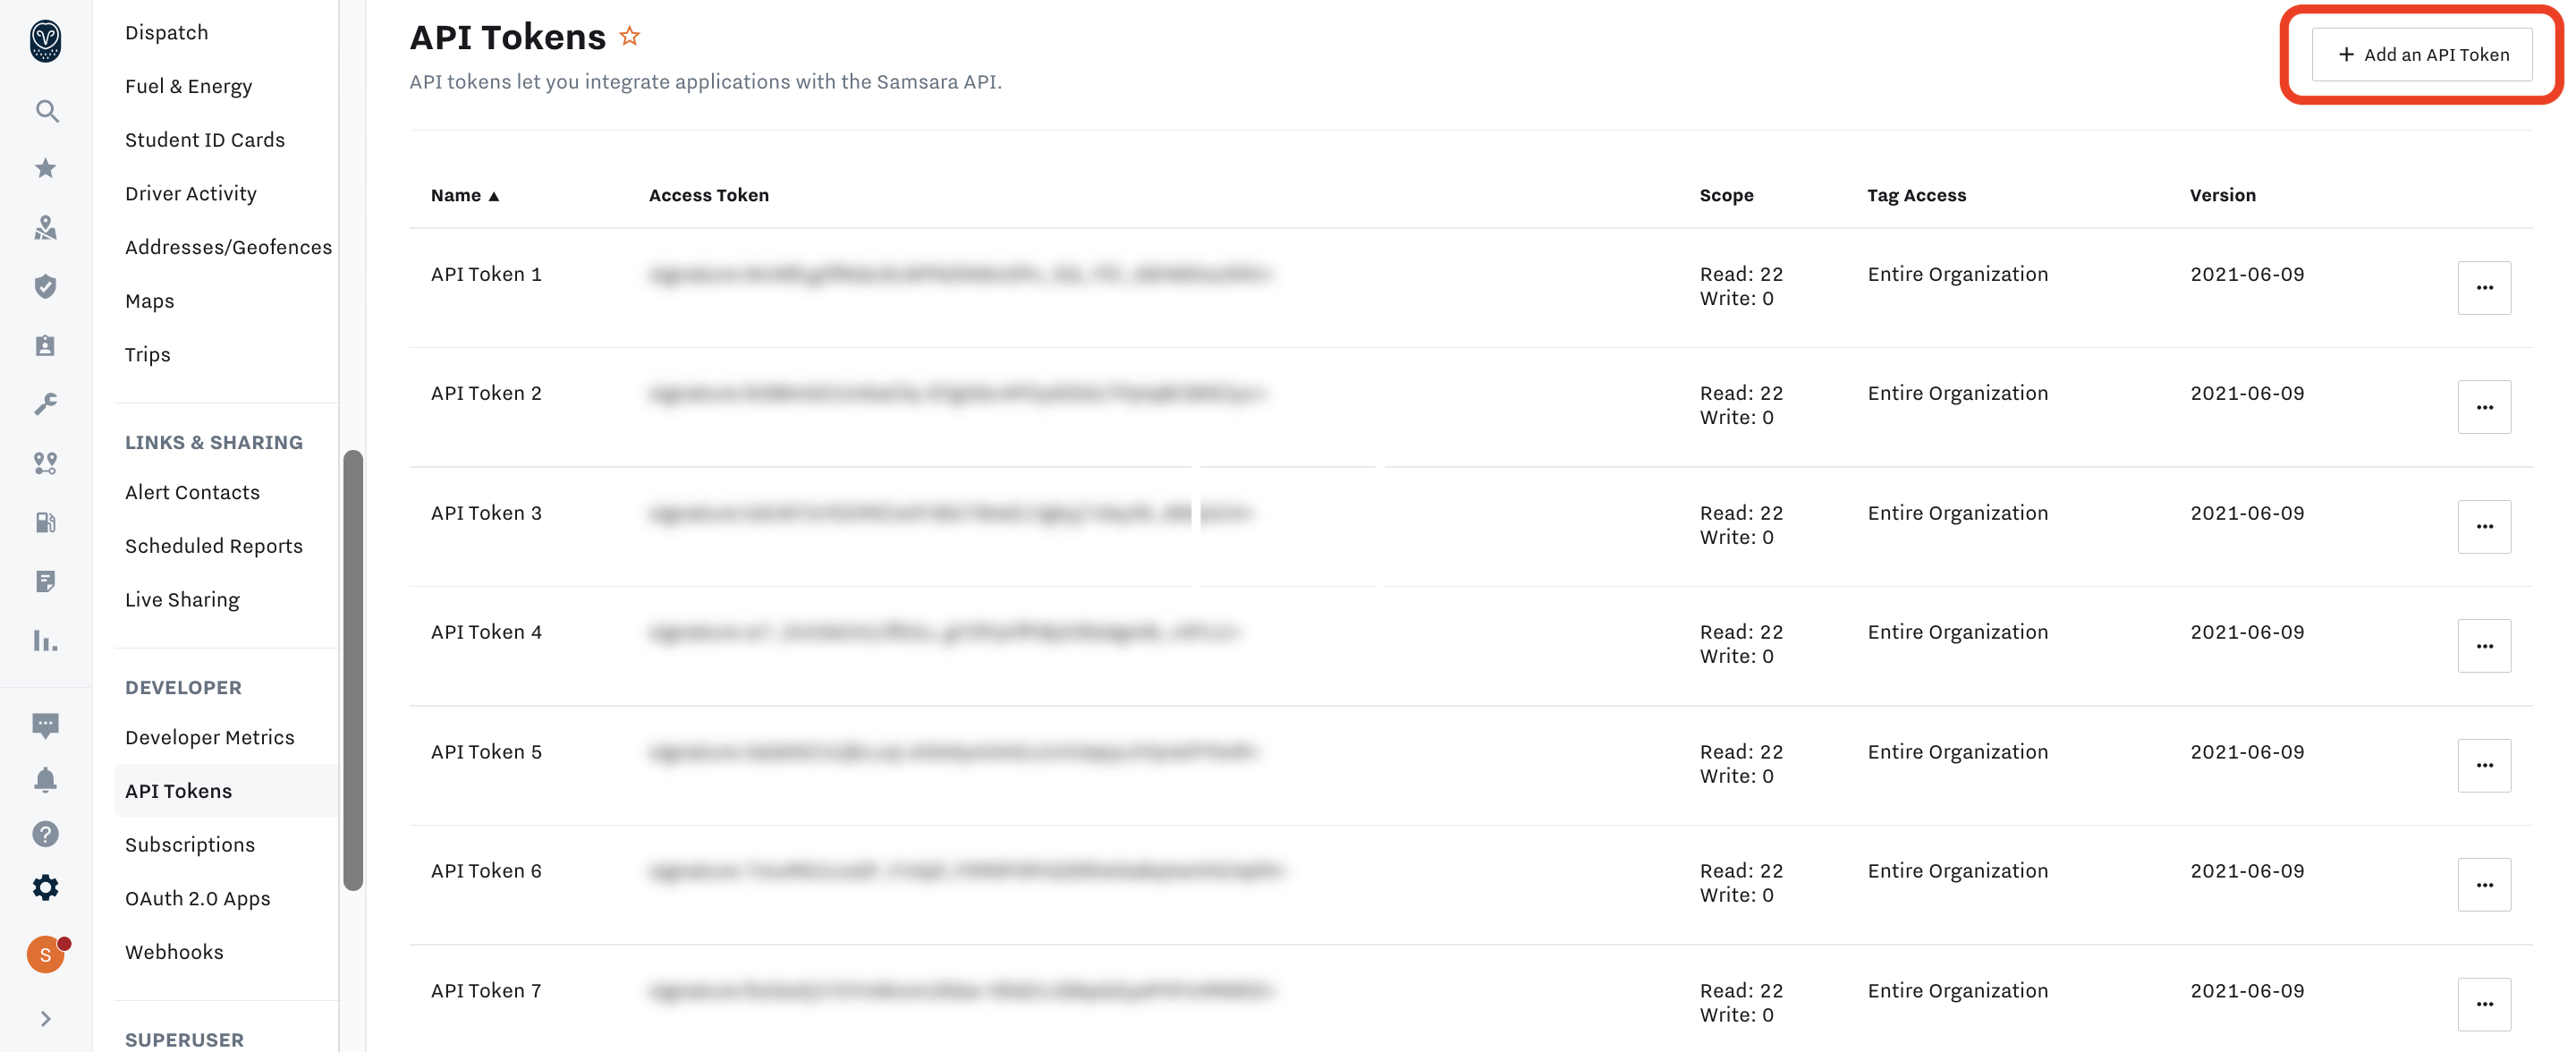
When creating a token, you will need to set:
- API Token Name: the best practice is to have one API token for a single integration. If you have multiple API tokens, we recommend creating a unique API token per integration.
- Tag Access: limits which Samsara tags can be accessed when using the API token. See more below.
- Granular Scopes: limits which types of data can be accessed when using the API token. See more below.
Once your create the token, you can copy it as shown below:
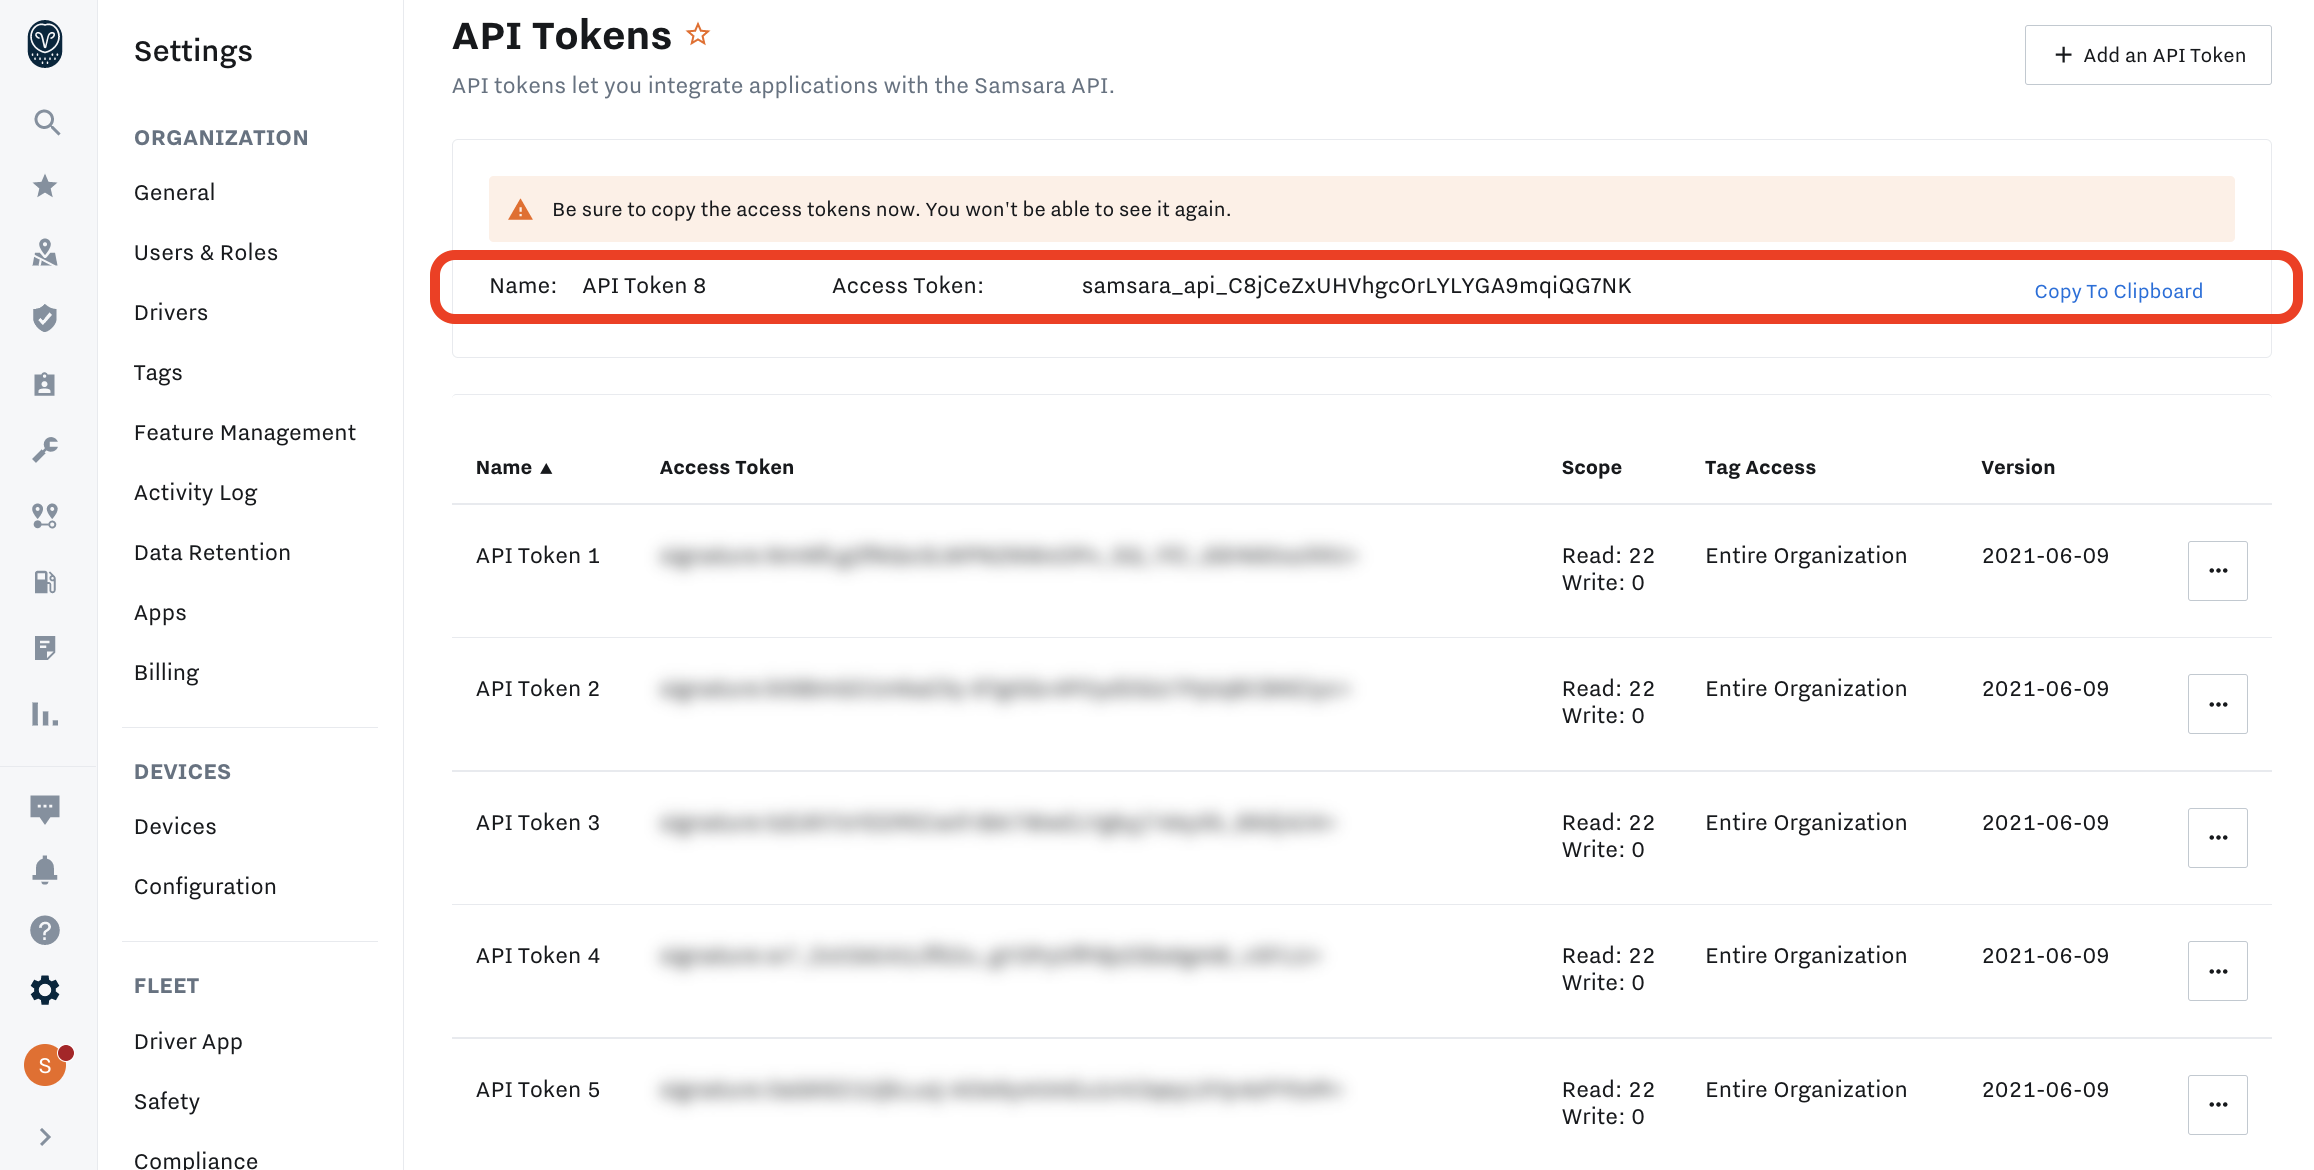
Once you create your API token, you will not be able to access the plaintext for the token after your copy it. Be sure to keep the token safe after copying. If you lose the token, you can regenerate the token as shown below.
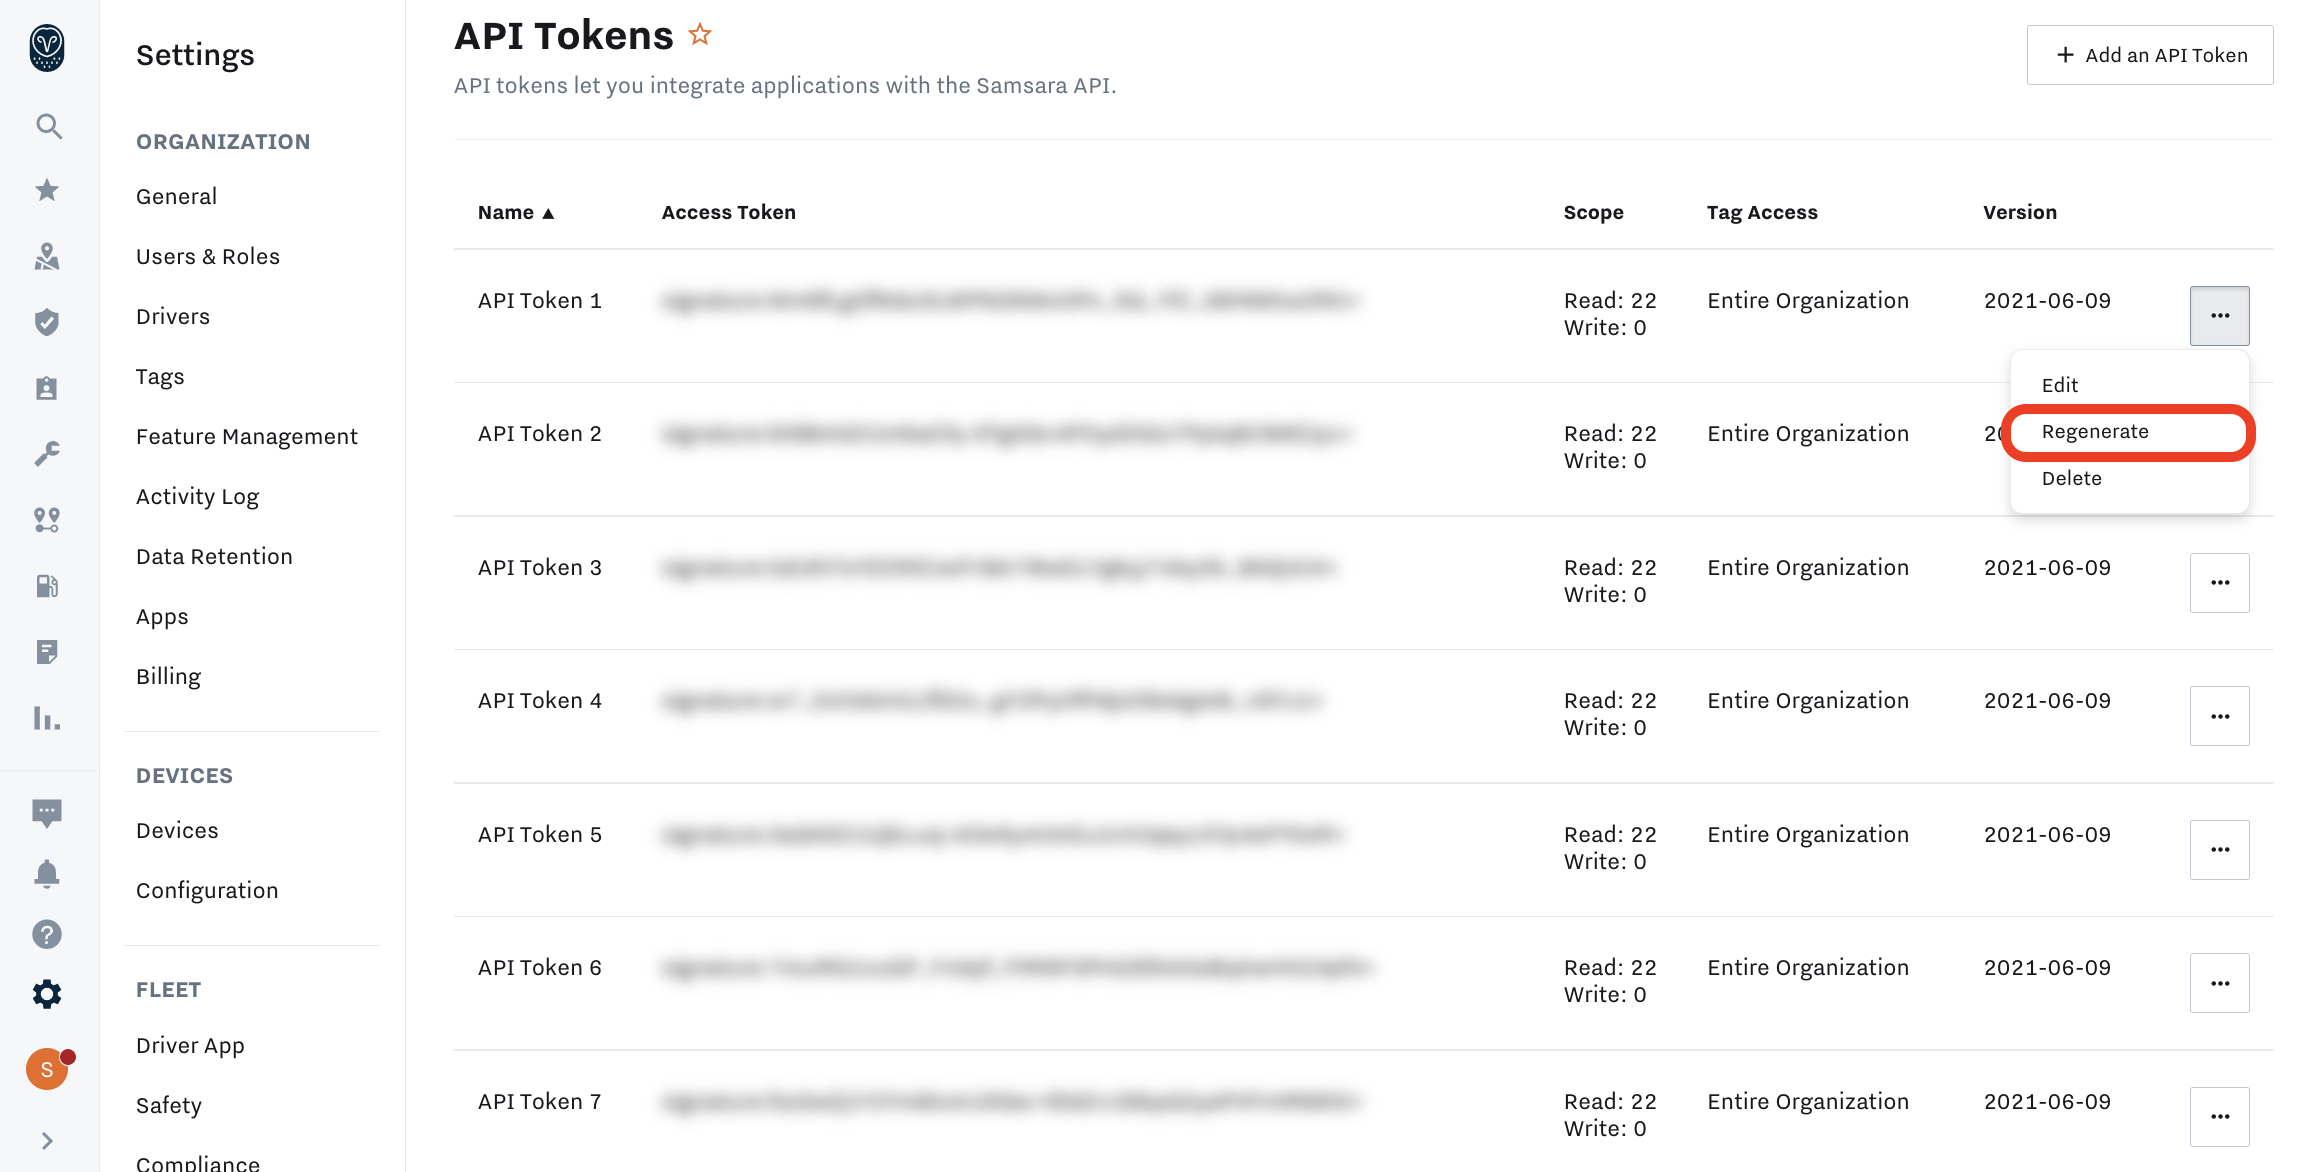
NOTE: If you regenerate the token, the previous token will stop working, so be sure that no live integrations are heavily dependent on the existing token during the time you regenerate otherwise those integrations may break. Consider creating a new token and updating any integrations and then deleting the old token.
Tag Access
You can add tags to your API token:
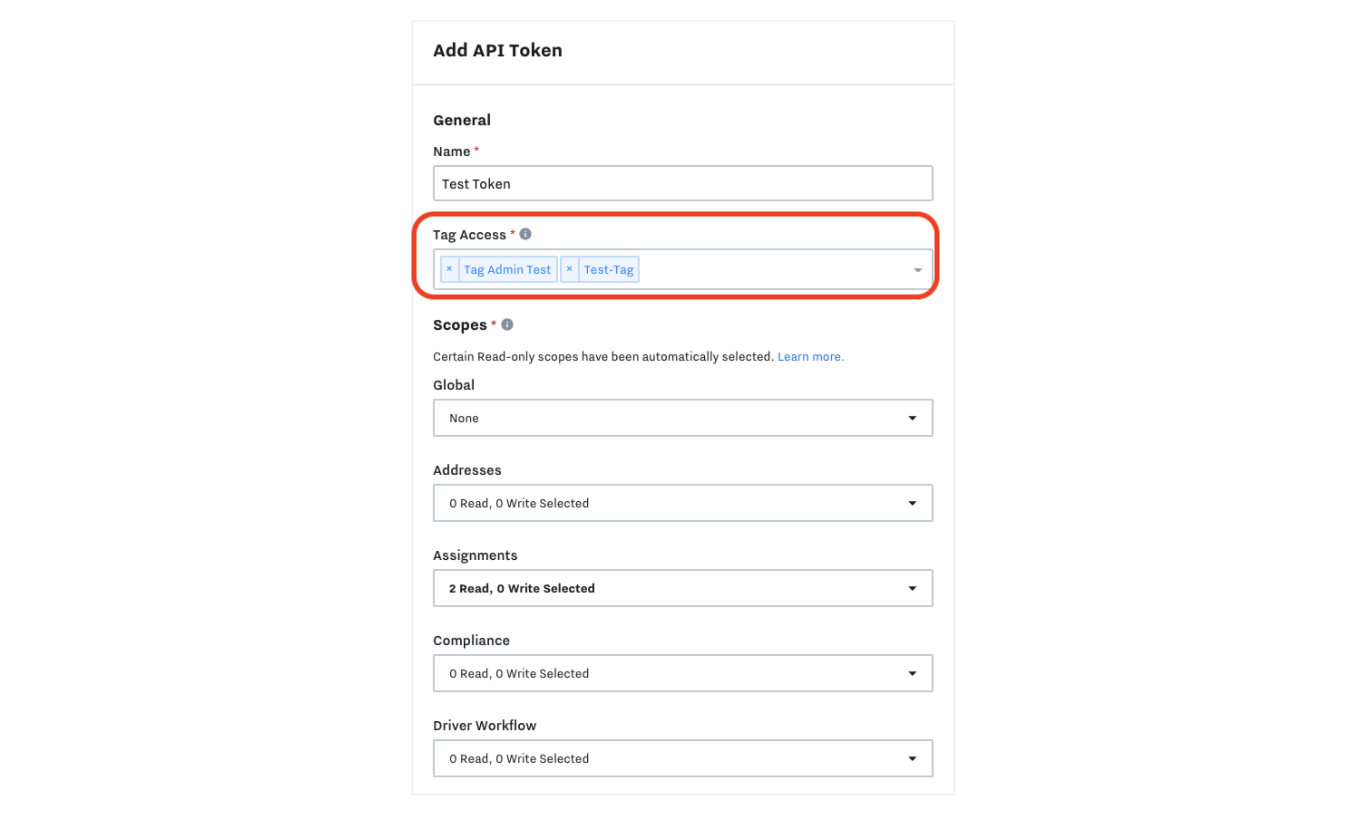
This will limit the access of the API token to objects with the tags that you select. (By default, an API token will be created with access to the entire organization). Data that is not within one of the selected tags will not be accessible to the API token.
In order to successfully create data using a Full Admin tag-scoped token, the given tag must be included in the request body. For example, in order to create a driver using the "West Tag Full Admin" API token above, the tag ID for the "West" tag must be included in the API request:
{
    "name": "Driver in West Tag",
    "username": "driverInWestTag",
    "password": "driverInWestTagPassword",
    "tagIds": [
        "2931064"
    ]
}
Granular Scopes
Granular scopes give you the ability to limit what API endpoint(s) the token can access to create, retrieve or manipulate data. You can set granular scopes when you create an API token.
Each granular scope grants access to a specific set of API endpoints. The ability to Read or Write data is always broken out into two different scopes. For example, when you grant scope access to "Read Assignments", this limits token access to only the GET /fleet/driver-vehicle-assignments API endpoint. However, because granular scopes are applied at the level of API endpoints, the API response may include related data to the nominal granular scope. For example, GET /vehicles requires "Read Vehicle" scope access, however the API response includes driver information for vehicles that have a static driver assignment. Consult the API reference documentation to see data returned.
To determine the granular scope required to call a specific API endpoint, refer the API reference documentation. Here is an example:

See the screenshot below that showcases selecting scopes when creating/editing a new API token:
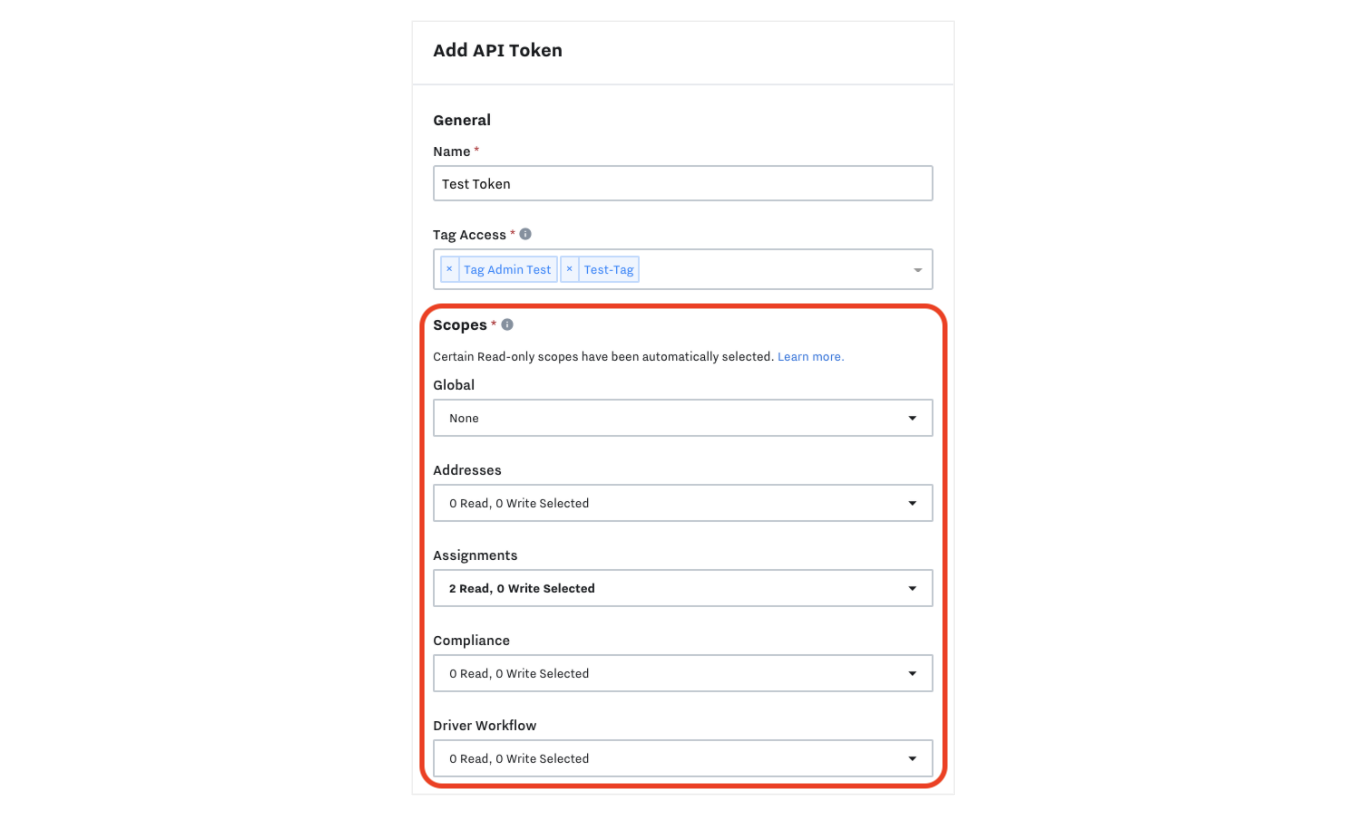
All newly created API tokens will have a default set of "Read" scopes selected:
- AEMP
- Alert Contacts
- Assignments
- Attributes
- Carrier-Proposed Assignments
- Driver App Settings
- Drivers
- Equipment
- Equipment Statistics
- Gateways
- Jobs
- Org Information
- Sensors
- Tags
- Trailer Statistics
- Trailers
- Users
- Vehicle Statistics
- Vehicle Trips
- Vehicles
- Webhooks
Legacy API Endpoint Scopes
If you are using any of our Legacy API endpoints, refer to the required scopes below that would be needed to call these endpoints
- GET endpoints require the "Read" permission for the relevant scope
- PUT, PATCH, POST, and DELETE endpoints require the "Write" permissions for the relevant scope
- NOTE: endpoints that are not publicly documented in our Legacy API Docs are not currently supported
API Endpoint | Required Scope |
|---|---|
GET v1/addresses POST v1/addresses DELETE v1/addresses/.address_id GET v1/addresses/.address_id PATCH v1/addresses/.address_id POST v1/fleet/add_address | Addresses |
GET v1/contacts | Alert Contacts |
GET v1/fleet/trailers/assignments | |
GET v1/fleet/drivers/document_types | Documents |
GET v1/fleet/drivers | Drivers |
GET v1/fleet/maintenance/dvirs | DVIRs |
GET v1/fleet/drivers/.driver_id/hos/audit_logs | ELD Hours of Service (US) |
GET v1/fleet/assets | Equipment |
GET v1/fleet/assets/locations | Equipment Statistics |
GET v1/industrial/machines | Industrial |
GET v1/fleet/messages | Messages |
GET v1/fleet/dispatch/routes | Routes |
GET v1/fleet/drivers/.driver_id/safety/score | Safety Events & Scores |
GET v1/sensors/cargo | Sensors |
GET v1/tags | Tags |
GET v1/fleet/assets/reefers | Trailers |
GET v1/user_roles | Users |
GET v1/fleet/locations | Vehicle Statistics |
GET v1/fleet/trips | Vehicle Trips |
GET v1/fleet/list | Vehicles |
OAuth 2.0
Check out the OAuth 2.0 page to see how you can enable users to automatically grant API access to your application.
Updated 4 months ago
